Using Git for .NET Development: Part 2 – basic operations and tools
This is part two of a series of blogs which I'm writing as I learn about Git, an open source distributed version control system, and find out how it can be used for .NET development. In part one I talked about Git's distributed architecture, its approach to version management, and its support for frequent branching and merging.
In this blog, I'll be describing some of the tools you can use to work with Git, and the day to day operations that you can carry out using these tools – such as saving new versions of your source code. You'll see the word 'commit' used a lot – to recap from part one, a commit is a snapshot of the code base at a particular moment in time.
At endjin, we use Git for source control, and employ a range of tools which help us work with Git within a .NET development environment. The tools I'm going to cover in this blog fall into two categories:
- Git hosting services (in fact I'm just looking at one, GitHub)
- Git clients – desktop applications which you can use to work with local and remote Git repositories.
While I'm looking at the clients, I'll show how you carry out the basic Git operations with each.
GitHub
A fundamental characteristic of Git its flexibility, and distributed structure. Each developer has their own full copy of a repository, and it's easy to share changes with any other repositories. However, when you are collaborating on a project, it's useful to have a single, central repository which is always available, and accessible from anywhere.
GitHub provides hosted Git repositories, alongside some very useful team working, documentation, tracking and visualisation tools, alongside social networking features.
For open source development, a public web-based repository has the advantage of making your project widely available and encouraging participation from around the world. For a team working privately on closed projects, GitHub offers private repositories, although this attracts a monthly fee.
GitHub's graphs and charts showing repository activity.
![clip_image001[4] clip_image001[4]](https://res.cloudinary.com/endjin/image/upload/f_auto/q_80/assets/images/blog/2014/03/clip_image0014.png)
Branch visualisation in GitHub.
Git Clients
Git was not designed as a graphical user interface (GUI) application. It was designed for the Linux shell environment. Windows users were originally able to use Git through Cygwin. More recently, Posh-Git lets Windows users work with Git using PowerShell. Command line applications remain the most powerful tools for working with Git.
I won't be covering Git with PowerShell in this blog, but there are instructions on how to use Posh-Git to access Git from PowerShell on Howard's blog A step-by-step guide to using GitFlow with TeamCity part 2 – a branching model for a release cycle.
As Git has grown in popularity, a range of clients which provide a Windows-compatible GUI for Git have sprung up, including Git Extensions, SmartGit, TortoiseGit and SourceTree. The Git site lists several more. However, all the clients I've come across still offer a built in command line tool which you can access Git from directly in times of need. It seems like everyone here has their favourite Git client. The client I'll be describing is the one I've been using, SmartGit.
More recently, Visual Studio has introduced support for working with Git through the Team Explorer Window. This is built into Visual Studio 2013, and available through the Visual Studio Tools for Git extension for Visual Studio 2012.
![clip_image001[6] clip_image001[6]](https://res.cloudinary.com/endjin/image/upload/f_auto/q_80/assets/images/blog/2014/03/clip_image0016.png)
I should point out here that there are several ways to work with Git through Visual Studio. You can use Git within Team Foundation Server, where it replaces Team Foundation Version Control, or you can use it as a standalone service, and host your repository internally or externally using a service such as GitHub. Or you can even take a hybrid approach - use a GitHub repository and push changes to a Git repository in Team Foundation Server at intervals. One Git repository behaves just like another. At endjin we use both the standalone and hybrid methods, but this blog just describes using GitHub as a freestanding alternative to TFS. The Visual Studio Tools for Git extension can be used in all of these cases.
Installing Git and the clients
The Git library libGit2 is now built into Visual Studio, so you don't need to install Git separately to use Git through the Visual Studio Team Explorer window. If you are using Visual Studio 2013, you don't even need to install an extension – support for managing Git repositories through Team Explorer is also built in. If you are using Visual Studio 2012, to install the Visual Studio Tools for Git extension, either install it through Visual Studio's Tools > Extensions and Updates menu, or download it from the MSDN site and follow the installation wizard.
To use other clients such as SmartGit, you will first need to install Git for Windows. Third party clients use Git in a slightly different way to Visual Studio. They make use of Git's command line tools – actions you take in the GUI are translated into a Git command line instructions. Visual Studio uses libGit2 directly. You won't be able to use Git through the command line unless you install Git separately. Visual Studio warns of you this:
![clip_image001[8] clip_image001[8]](https://res.cloudinary.com/endjin/image/upload/f_auto/q_80/assets/images/blog/2014/03/clip_image0018.png)
To install Git for Windows, download it from the Git website. Run the .exe, and go through the installation wizard. I choose the default options for 'Select components', 'Run Git from Windows Command Prompt' for 'Adjusting your PATH environment', and 'Checkout Windows-style, commit Unix-style line endings' for my line ending settings.
After you've installed Git, to install SmartGit, download the package from the SmartGit website, run the .exe, and follow the installation wizard. I choose the default options. SmartGit is only free for non-commercial use, but a trial period is available. It is a Java application and requires you to install the Java SDK on your machine.
SmartGit will ask you to create a SmartGit-specific master password, which it requires when you push changes to a remote repository.
If you are using more than one Git client, both can work with the same Git installation and repositories on your machine. A Git version check on the command line offered by the Visual Studio and SmartGit (git -–version) confirms this. Both work off the same configuration files, such as the repository-specific .gitignore file, which you use to specify files and folders that should never be includes in saved versions of the repository. Similarly, Git's bin and obj directories are shared by all Git clients and also, if you're using package restore, the NuGet Package Repository.
Cloning a remote repository
First, to get a copy of a remote repository on your machine. Cloning makes a copy of the entire repository, including all branch information and a full commit history. Git refers to the remote repository from which a local repository was cloned as 'origin', unless you give it another name.
A Git project consists of three main areas:
- The working directory, where files are edited
- The staging area, where changes are selected before being added to the repository
- The repository (also known as the directory), which stores saved versions of the source code.
The content of the working directory is drawn from a particular saved version of the source code – usually the most recent commit.
As well as copying a remote repository, the cloning operation checks out a copy of the most recent commit to the working directory, which is what you see when you open the solution in Visual Studio.
Command line
With the command line, cloning a repository is short but sweet:
git clone <url>
A quick note on conventions - in command line instructions I've put values that need to be altered in angle brackets
Visual Studio
The Visual Studio extension is excellent here – you can add or clone repositories from GitHub in a few clicks.
You copy the location of the repository. GitHub makes this particularly easy:
![clip_image001[10] clip_image001[10]](https://res.cloudinary.com/endjin/image/upload/f_auto/q_80/assets/images/blog/2014/03/clip_image00110.png)
Then back in Visual Studio, on the Git Tools Connect page, you select 'Clone' from the menu, and paste the URL into the yellow box.
![clip_image002[4] clip_image002[4]](https://res.cloudinary.com/endjin/image/upload/f_auto/q_80/assets/images/blog/2014/03/clip_image0024.png)
Finally you click the 'Clone' button.
SmartGit
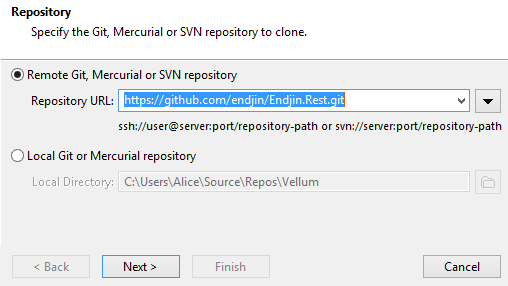
To clone a repository in SmartGit, select 'Clone' from the 'Project' menu, and enter the URL of the remote repository. Click 'Next', and enter the master password which you created for SmartGit.
Creating a new repository
As well as cloning existing repositories, you might want to create your own, and share them with other team members later.
Command line
To create a new repository using the command line:
git init
Visual Studio
To add a new local repository through Visual Studio, tick the 'Add to source control' checkbox when you create the project, and choose the top level folder used for your Git repositories. Select to add a new directory. After the new project wizard has completed, you'll be asked whether you want to select TFVS or Git for source control. Select Git, and the project will appear in the 'Local Git Repositories' list in Team Explorer.
You can also add a new empty repository directly through Team Explorer.
SmartGit
To create a new local repository using SmartGit, you select Project > Open (New) Repository.
As the name suggests, this option is used both to open an existing repository, and to create a new one. You will be prompted for the location of the repository – to create a new one you just point to an empty directory.
![clip_image001[12] clip_image001[12]](https://res.cloudinary.com/endjin/image/upload/f_auto/q_80/assets/images/blog/2014/03/clip_image00112.png)
You will be asked to choose which 'Project' should be used to open the new repository – this is a SmartGit-specific project.
Staging and committing changes
A commit stores the state of the repository, alongside metadata such as the committer's email and a pointer to the commit (or commits) that came directly before it.
I mentioned earlier that there are three main areas in Git:
- The working directory
- The staging area
- The repository.
This maps to the five basic states that files can be in according to Git:
- Untracked - newly added to the working directory
- Unmodified – not changed in the working directory
- Modified - changed in the working directory
- Staged – added to the staging area in preparation to be saved to the repository
- Committed – added to the repository.
Before you carry out of commit, you will normally carry out a staging operation, moving changes to the staging area (also known as the 'index'). Staging means specifically marking out particular changes that you want to reflect in one – or multiple – commits. This helps you bundle up changes into atomic units of change. 'Changes' here includes changes to existing files, the creation of new files, and file deletions. One thing to get your head around is that to record in the repository that a file has been deleted, you need to stage the deletion.
After you've staged a set of changes, you commit these changes to the repository, adding a message which describes what's been altered. It is possible to choose to commit only some of the staged files, though I won't describe that option here.
Command line
To check whether there are any new files, modified files, or deletions in the working directory, which haven't been added to the staging area:
git status
![clip_image001[14] clip_image001[14]](https://res.cloudinary.com/endjin/image/upload/f_auto/q_80/assets/images/blog/2014/03/clip_image00114.png)
To add a modification or new file to the staging area:
git add <filename>
To add the deletion of a file to the staging area:
git rm <filename>
To commit the changes which are in the staging area:
git commit -m "Fix bug #101"
Visual Studio
The Changes area in Team Explorer lists files which have been updated but not committed. It lists new files, file removals, and file modifications. Changes are staged by default - you don't need to carry out a separate stage operation before committing. However, you can drag changes you don't want to commit into an excluded section to remove them from the staging area.
There's also an untracked files section. As far as I can tell term is not used in exactly same way as it is by Git. The Git documentation uses 'untracked' to refer to any files which weren't in the last commit, whereas the extension doesn't always list new files in the untracked area – in the screenshot below they have already been staged for us in the included changes area.
![clip_image001[16] clip_image001[16]](https://res.cloudinary.com/endjin/image/upload/f_auto/q_80/assets/images/blog/2014/03/clip_image00116.png)
Once you've entered a commit message, the 'Commit' button is enabled and you can commit changes to your repository.
SmartGit
With SmartGit you manually carry out separate stage and commit operations. Files which have changed since the previous commit are displayed in Files area, which is shown when you open SmartGit. This area automatically updates to reflect changes being made to the source code.
Each change is displayed with a filename, and a state:
- Modified – a tracked file which has been updated
- Untracked – a new file
- Missing – a tracked file which has been removed.
This terminology corresponds more closely with the terminology used in the Git documentation. Files which have specifically been excluded through the gitignore file do not show up in SmartGit's Files area (unless you want them to).
The changes that you want to commit can be selected with the mouse, and staged in one go.
![clip_image001[18] clip_image001[18]](https://res.cloudinary.com/endjin/image/upload/f_auto/q_80/assets/images/blog/2014/03/clip_image00118.png)
Once you have staged a set of changes, their displayed states change:
- 'Modified' becomes 'Staged'
- 'Untracked' becomes 'Added'
- Missing' becomes 'Removed'.
To commit the staged changes, select the 'Commit' icon, and enter a commit message in the pop up box that appears.
![clip_image002[6] clip_image002[6]](https://res.cloudinary.com/endjin/image/upload/f_auto/q_80/assets/images/blog/2014/03/clip_image0026.png)
Seeing and comparing commits
You might want to remind yourself what you & others have changed, or, pinpoint where something changed.
Command line
To see information about commits, on one line each:
git log --oneline
![clip_image001[20] clip_image001[20]](https://res.cloudinary.com/endjin/image/upload/f_auto/q_80/assets/images/blog/2014/03/clip_image00120.png)
To see the difference between the latest commit and the previous commit:
git diff HEAD~1
To see a visual representation of branches:
git log --oneline --graph
Visual Studio
In the Commits area, selecting 'Actions' then 'View History' displays a list of commits in the main Visual Studio window.
![clip_image003[4] clip_image003[4]](https://res.cloudinary.com/endjin/image/upload/f_auto/q_80/assets/images/blog/2014/03/clip_image0034.png)
SmartGit
SmartGit's 'Log' tool provides a list of commits together with a graphical representation of branches.

'Undo' local changes
Arg you've completely messed up your local repository! Never mind. You can revert to a previous commit, or start afresh by getting a new copy of the remote repository, and removing all your local changes and commits.
Command line
To replace the changes for a particular file in your working directory with the last content in HEAD:
git checkout --<filename>
To reset everything you've done locally on a branch – commits and changes in the working directory:
git fetch origin
git reset --hard origin/<branch>
Visual Studio
I switched to the command line provided by the extension, the one time I tried undoing local changes through the Visual Studio extension.
SmartGit
SmartGit's 'Local' menu lets you choose to Discard files, which reverts their content back to their index state, or back to their repository state. You can also use the local menu to undo the last commit.
What about branching, and sharing my changes?
The next blog in this series will continue looking Git operations using the command line, Visual Studio and SmartGit. It will describe the basic branching operations, and push and pull operations to share changes with a remote repository.
Writing this blog, I used these excellent resources:
- The official Git documentation – clear, in depth descriptions with great diagrams
- Git – the simple guide by Roger Dudler – a short, 'get you up and running', visual guide to the crucial Git commands.

